To cradle a wood panel for painting, glue hardwood strips along the back edges of the panel so the artwork stands off the wall like a shallow box. Glue them flat and square, let the joints cure fully, then prime and seal every face before you brush on anything. Budget half a day for a panel up to about 16 by 20 inches, plus a night for the glue and a day for the gesso.
The cradle is the part that turns a sheet of plywood into something a framer will hang without wincing. It leaves no nail holes in the painted face, stops the board drumming inside a frame, and gives you the shadow gap that gallery-hung work has.
This guide covers building a cradle onto a blank panel. If you already own a finished painting and want to add a cradle to it, read the mistakes section first — that job has rules of its own and the wrong clamp will cost you the painting.
Table of Contents
- What You Need
- The cut list
- Step-by-Step: How to Cradle a Wood Panel for Painting
- 1. Inspect the panel and choose the cradle layout
- 2. Mark and position the cradle supports
- 3. Attach the cradle without damaging the panel
- 4. Reinforce corners and contact points
- 5. Check stability, movement and surface protection
- Common Mistakes
- Safety and Studio Tips
- Frequently Asked Questions
- Why do artists cradle a wood panel before painting?
- What is the best wood thickness for a cradled painting panel?
- How far should the cradle supports sit from the panel edges?
- Can I cradle an MDF panel, or is plywood better?
- How do I fix a cradle if the panel no longer moves?
- Do I need to seal the wood before painting a cradled panel?
- Conclusion
What You Need
You need four things: the panel, the cradle lumber, glue, and a way to hold the assembly flat and square while the glue sets. Everything else is a nicety.
- The panel. Half-inch baltic birch is the studio default for work up to about 20 inches. Quarter-inch is workable for studies and classroom panels if you seal the back face; thinner than that cups.
- Cradle strips. One-inch-wide hardwood is the most common choice: poplar, pine, or leftover frame moulding cut on a miter saw. Artists on Reddit r/ArtistLounge complain constantly that big-box stores stopped stocking wide hardwood trim, and they are right.
- PVA wood glue. Grab a bottle you can squeeze, not a dark bottle of furniture glue that you have to guess at.
- Clamps and cauls. Four to six clamps you can reach from both sides, plus two flat scrap boards to spread pressure.
- Screws, optionally. A few short screws for reinforcing the corner joints after glue-up. Not for driving into the panel.
- Measuring tools. A tape, a square, and a pencil. That is genuinely it.
- Eye and ear protection if you are cutting on a miter saw or table saw.
When you cannot find one-inch hardwood, you have three workable substitutes. Rip a wider board down on a table saw and keep the offcut for another panel. Glue two three-quarter-inch strips face to face and use them as one thick strip. Or skip the full cradle and use corner blocks, which need only short offcuts.
The cut list
Measure the finished size of the panel face, not the sheet it came off. Every dimension below is a worked example I have used, not a rule, so scale the numbers to your panel and check the finished depth against your frame before you cut.
| Panel face | Cradle strip width | Length, two long sides | Length, two short sides | Finished depth |
|---|---|---|---|---|
| 8 x 10 in | 3/4 in | 10 in | 8 in | 1 1/4 in |
| 11 x 14 in | 1 in | 14 in | 11 in | 1 1/2 in |
| 16 x 20 in | 1 in | 20 in | 16 in | 1 1/2 in |
| 20 x 24 in | 1 in | 24 in | 20 in | 1 1/2 in |
| 24 x 30 in | 1-1/4 in | 30 in | 24 in | 1 3/4 in |
Cut every strip one-eighth inch longer than the panel edge it runs along. That overhang gives you a dry-fitting tolerance and a place to catch squeeze-out. Finished depth is simple addition: a half-inch panel plus one-inch strips gives you one and a half inches, which is what most floater frames are cut to clear.
You also need to know the finished depth before you build. A one-and-a-half-inch-deep panel will not sit in a shallow floater frame, and finding that out after glue-up means picking the assembly apart.
Step-by-Step: How to Cradle a Wood Panel for Painting
1. Inspect the panel and choose the cradle layout
Set the panel face down on a flat table and check for a bow. Hold a straightedge across the face in both directions and look for daylight underneath, then flip the panel and check the back again. A panel that already curves is telling you something, and gluing a cradle onto it will lock that curve in rather than fix it.
Mark the weak spots with pencil. Look for splits at the edges, old pencil lines, screw holes from a previous hanging, and any place the plywood face has lifted or printed through.
Choose the layout from what you find and from the panel’s size. A full cradle suits anything larger than about 12 inches on a side, or any panel you plan to hang in a floater frame. Short risers are enough for small works under roughly 10 by 8 inches. Corner blocks work for a small study or a sample board, and they take ten minutes.
The test for a finished cradle is that the panel rests on the cradle without touching the wall. If any part of the panel’s back contacts the wall, the cradle is either uneven or too shallow.
2. Mark and position the cradle supports
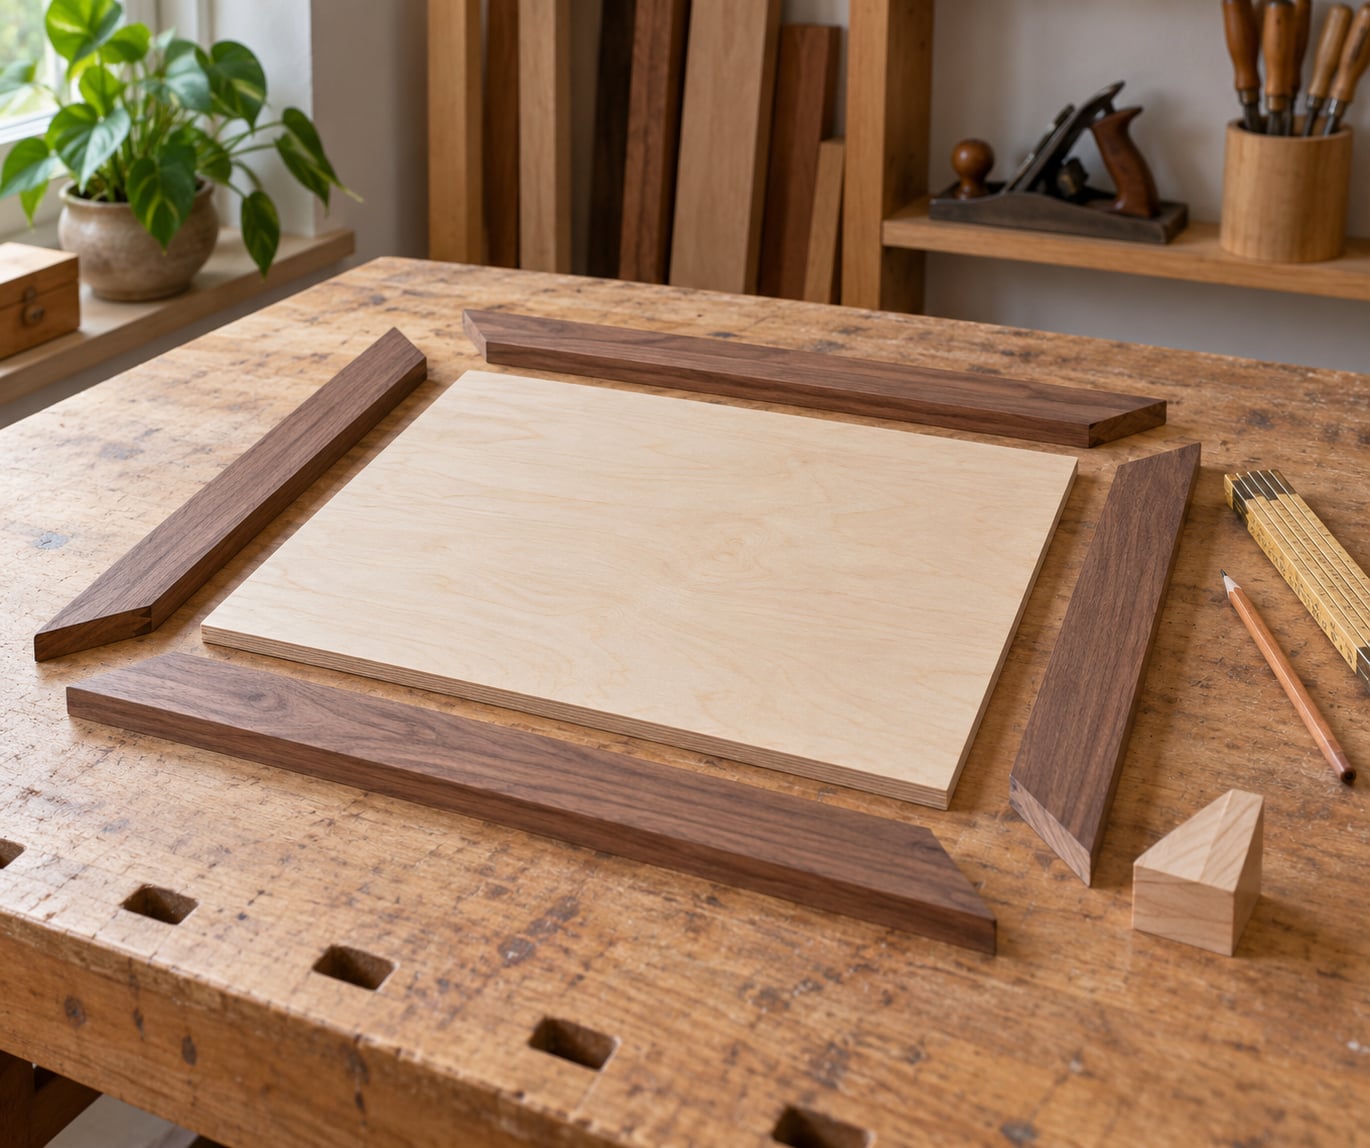
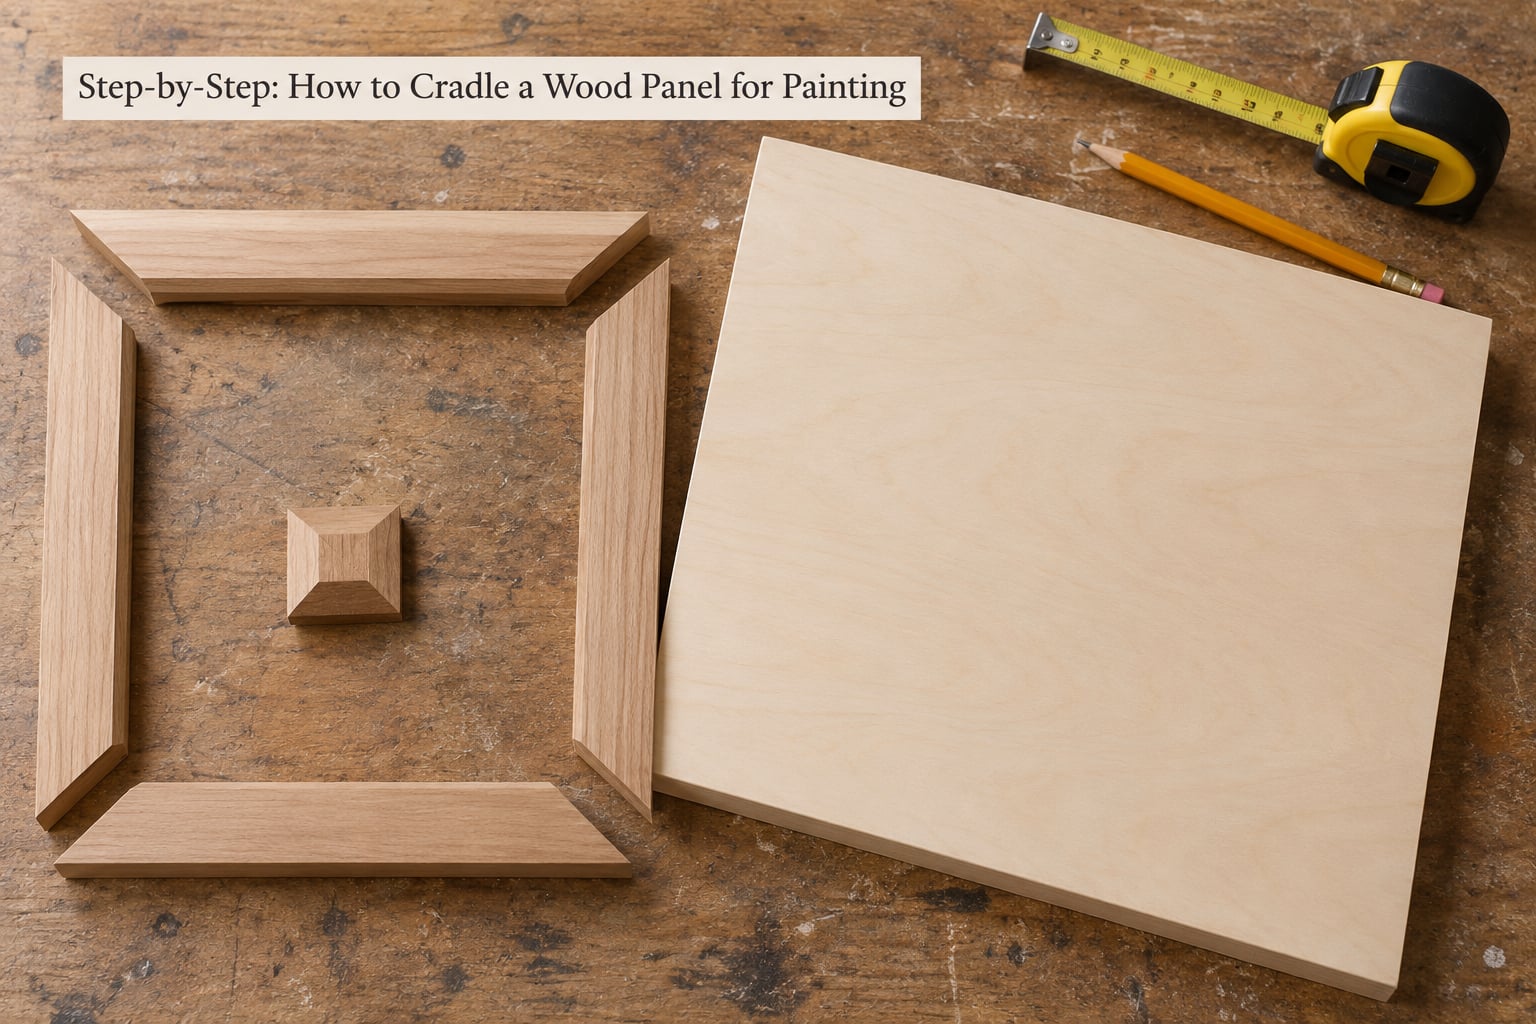
Turn the panel face down on a flat surface covered with a clean cloth or scrap cardboard. Lay the long strips along the two long edges and the short strips along the two short edges, forming a rectangle.
Set them so an even strip of bare panel shows on all four sides — about half an inch works well on most panels. That gap keeps glue off the panel’s edge, where squeeze-out cannot always be scraped away without marking it.
Check squareness by measuring corner to corner in both directions. If the two diagonals differ, nudge a strip before you commit. Also check that the strips do not overhang the panel edge by more than a few millimeters, since an overhang becomes the first thing a framer runs into.
Now check clearance. A cradled panel must be able to expand slightly with humidity without being pinched by its own cradle. Dry-fit the strips and slide the panel gently: if you can force movement and hear it bind, the fit is too tight.
3. Attach the cradle without damaging the panel
Lay a thin, continuous bead of PVA along the top edge of each strip. Use less than you think — a full bead squeezes out under the clamps and gets onto the panel, where dried glue is a permanent mark. If the glue has a cap you can twist, put a pin hole in it so the bead flows evenly instead of glugging.
Set the strips in position, one at a time, and check the rectangle again before you touch a clamp. Press each strip down with your palm, not your fingertips on the edge.
Clamp from the back. Run a caul along each strip and tighten the clamps progressively, working around the rectangle, rather than pinning one corner first. A gradual sequence keeps the frame square.
Wipe squeeze-out from the panel’s edge with a damp rag while the glue is still soft, working from the inside out. Glue that has soaked into the end grain of a plywood edge is stubborn; keep it off in the first place.
Leave the clamps on overnight. PVA grabs in a few hours but gains most of its strength over about a day, and an impatient release is how cradles come apart at the corners later.
The panel thickness changes the order of work. With a quarter-inch panel, treat glue as the only bond and keep the clamps gentle. With half-inch or thicker, you can add screws through the cradle into the panel edge once the glue has set. With three-quarter-inch or solid wood, you can drive screws into the panel body itself without much risk of splitting.
4. Reinforce corners and contact points
Mix a small batch of PVA in a disposable cup and reinforce the four inside corners the way you would a picture frame. A triangular block of offcut, or a small square of plywood set flush into the corner, spreads the load and stops the butt joints from racking apart when someone picks the panel up by its side.
Keep reinforcements flush with the inside of the cradle. Anything standing proud creates a pressure point, and that is exactly where a varnish or gesso film gets dented later.
Reinforce the mid-span too on panels longer than about 20 inches. One cross brace across the center, same width as the perimeter strips, keeps a long panel from developing a sag you can feel with a palm.
After the corner glue has set, add two short screws per corner through the strips and into the panel edge. Drive them by hand until the head is just seated. Over-tightening splits thin strips and can crack the panel edge, which is a known failure in the framing forum threads.
5. Check stability, movement and surface protection
Set the panel face up on a flat table. Press gently on each corner in turn and watch the gaps at the strip joints. Any gap that opens is a joint that needs more glue or another screw.
Rock the panel front to back on its front edge. It should settle on the front rail without rocking. If it rocks, one rear corner is proud — check your diagonals again and sand that corner down before you go any further.
Confirm movement. Push the panel gently against its cradle in one direction, then the other. You want a barely perceptible give, enough to show the cradle is not pinching the panel, but not a loose rattle.
Sand the cradle edges with 120 grit, working along the grain, until the corners are crisp and no finger can catch a splinter. Then seal the raw wood. Brush a thin coat of gesso or acrylic medium over the strips and the panel edges, letting it sink into the end grain.
Once everything is dry, paint or spray the cradle so it looks deliberate. Artists on the Creative Spark forum make the same point repeatedly: put your best-looking wood on the two sides that will show when the piece is hung, and finish those strips in matte black spray so they recede visually instead of competing with the painting.
Frame it in a floater frame, with a rabbet deep enough to clear the cradle without touching the painting surface. Screw into the cradle or the frame itself, never into the panel — that rule comes straight out of the conservation guidance archived at the University of Delaware’s MITRA forum, and it is the single most useful thing in this whole build.
Common Mistakes
Cradle strips too wide or too deep for the frame. Fix: measure your frame’s rabbet depth and confirm the finished depth before cutting. If the strips are already glued on, use offset brackets to display the panel without a frame at all.
Over-tightening screws. Small screws in thin hardwood split the strip, and a split strip transfers the split into the panel edge. Fix: drive screws by hand to seating and stop. If a strip cracks, glue a reinforcing block over it rather than tightening harder.
Fastening too close to the panel edge. Squeeze-out has nowhere to go and dries into the face. Fix: keep an even half-inch of bare panel showing inside the strip line and wipe the edge with a damp rag during clamping.
Uneven gaps between strips. A rectangle that is not square will rock and will never sit flush in a frame. Fix: measure corner to corner in both directions before glue-up, and check again after the first two strips are down.
Ignoring that wood moves. A panel pinned dead by an over-tight cradle will cup or crack when humidity changes. Fix: dry-fit first and confirm a hair of movement, and seal every face of the panel before painting.
Leaving the back face bare. An unsealed back exchanges moisture with the room faster than the sealed front, and the panel cups. Fix: brush a coat of gesso or acrylic medium on the back while you are sealing the edges. This is the honest limit of the whole exercise — a cradle adds stiffness, it does not stop cupping. Sealing all faces does that.
Letting glue dry on the panel edge. Dried PVA on a plywood edge will not come off without taking fibres with it. Fix: wipe while soft, and if you miss a spot, leave it and scuff the edge lightly rather than picking at it.
Leaving the cradle edges raw. Bare pine looks unfinished from the side, which is the most common complaint about cradled panels. Fix: sand, seal with gesso, then finish in matte black or a colour that matches the painting’s edge.
Cradling a finished, varnished painting without thinking. If you are in this position, understand the risk before you clamp anything. A conservator’s concern is not the weight but the contact points: clamps and cauls press on a cured surface and can leave dents in varnish, and glue squeeze-out on a painted edge is close to unfixable. If the painting is valuable, use a reversible method — silicone dots around the back perimeter paired with paper hinges as a failsafe, removable later with a thin blade. One framer on the MITRA archive thread does exactly this, and the same thread warns against silicone as the only bond because its longevity is unknown. Get a second opinion from a conservator before you touch the face.
Safety and Studio Tips
Cut strips on a miter saw or table saw with eye and ear protection, and clamp the work before your hand goes anywhere near a blade. On a table saw, rip narrow strips with a push stick and never reach across the blade path to catch offcuts. Finished hardwood strips are the most common source of kickback in this job because they are small, square, and gripped badly.
When you clamp a panel flat, place cauls and check clearances so a clamp foot never rests on the painting face. Clamp pressure can be surprising — snug is enough. If the panel is wider than your clamps can span, use four long cauls and work outward from the center.
Ventilate while you glue and while you spray finish the edges. Work in dust control when you sand the panel face.
On timing, treat glue as overnight, gesso as a full day between coats, and any varnish as longer than the label if you are in a cold room. Plan the sequence as cradle, then gesso the panel face and edges, then paint, then varnish, then seal the back last.
On hanging, size your hardware from the cradle rather than the panel. Screw D-rings or a French cleat into the back of the cradle strips and hang on two points at the top third of the frame, not at the very top. Panel weight runs a few tenths of a pound per square inch of face at typical thicknesses, so a 16 by 20 half-inch panel is a two-person lift.
Mixing media changes the moisture question. Watercolour, gouache, and mounted paper want a fully sealed panel with no absorbent back. Encaustic tolerates a rigid unsealed wood panel better than most. Mixed media collage usually wants a sealed surface plus an extra coat, because tape and paper add their own movement.
Frequently Asked Questions
Why do artists cradle a wood panel before painting?
A cradle adds a rigid hardwood frame along the back edges so the panel stops flexing and drumming inside a frame. It raises the painted face and sides off the wall, so nothing covers the artwork and no nail holes are needed in the panel itself. Artists also like that a cradled panel can be re-framed later without touching the surface. It is worth knowing the limit: a cradle adds stiffness but does not stop cupping. Sealing every face does that.
What is the best wood thickness for a cradled painting panel?
Half-inch baltic birch is the studio default for work up to about 20 inches on a side, and a teaching artist at the Lyme Art Association recommends it while warning that thinner plywood warps. Quarter-inch is fine for studies, classroom panels, and anything under about 12 inches, provided you seal the back face. Below a quarter inch the board cups easily and a cradle does not rescue it. Go thicker for large work: 20 by 24 and up wants three-quarter-inch or solid stock.
How far should the cradle supports sit from the panel edges?
Leave an even strip of bare panel showing inside the strip line, and about half an inch on all four sides works well. That gap gives glue somewhere to go without squeeze-out landing on the panel edge, where dried PVA can mark the fibres. Keep the strips from overhanging the panel edge by more than a few millimeters, because that overhang is the first thing a framer runs into. Then dry-fit and confirm the panel can still move a hair in its cradle.
Can I cradle an MDF panel, or is plywood better?
Plywood is better, and the difference matters more than most people expect. MDF has no veneers, so its edges are soft and friable, and screws driven into an MDF edge strip out almost immediately. Plywood holds a screw and takes glue along a face veneer without crumbling. MDF also moves more with humidity and has almost no resistance to splitting along its face. Cradling an MDF panel works as a frame, but plan on glue-only joints and a wide extra gap to allow for its movement.
How do I fix a cradle if the panel no longer moves?
Release the joint first rather than forcing anything. Slide a thin flexible putty knife or a segment of hacksaw blade into the gap between the strip and the panel and gently break the glue line, working from one corner rather than prying at one spot. Protect the panel edge with masking tape first so the blade cannot mark the wood. Once the cradle is off, scrape the old glue residue flat, check the panel for cracks, and re-glue with slightly narrower strips to buy back clearance.
Do I need to seal the wood before painting a cradled panel?
Yes. Sand the panel smooth, then prime or gesso it to seal the wood and give paint something to adhere to, and let it dry completely between coats. Raw birch plywood is porous and drinks oil, acrylic, and watercolour differently across the face and end grain, and unsealed wood keeps moving with humidity. Prime the edges and the back face too. Most studio painters brush the edges first because they are the parts people miss and the parts a floater frame shows.
Conclusion
Start by setting your panel face down on a flat table and checking it for a bow. That one check decides whether you cradle it now or fix the panel first, and it costs you nothing.
The principle underneath the whole job is simple: secure, but never tight. Glue holds the strips firmly enough to carry the panel’s weight and to sit still in a frame, while enough clearance remains that the wood can move with the season instead of splitting against its own cradle.
Then set the finished panel on a flat surface, press each corner in turn, and confirm a hair of give. Once that passes, seal every face, edge, and strip, and start priming. Test it before you paint, not after.