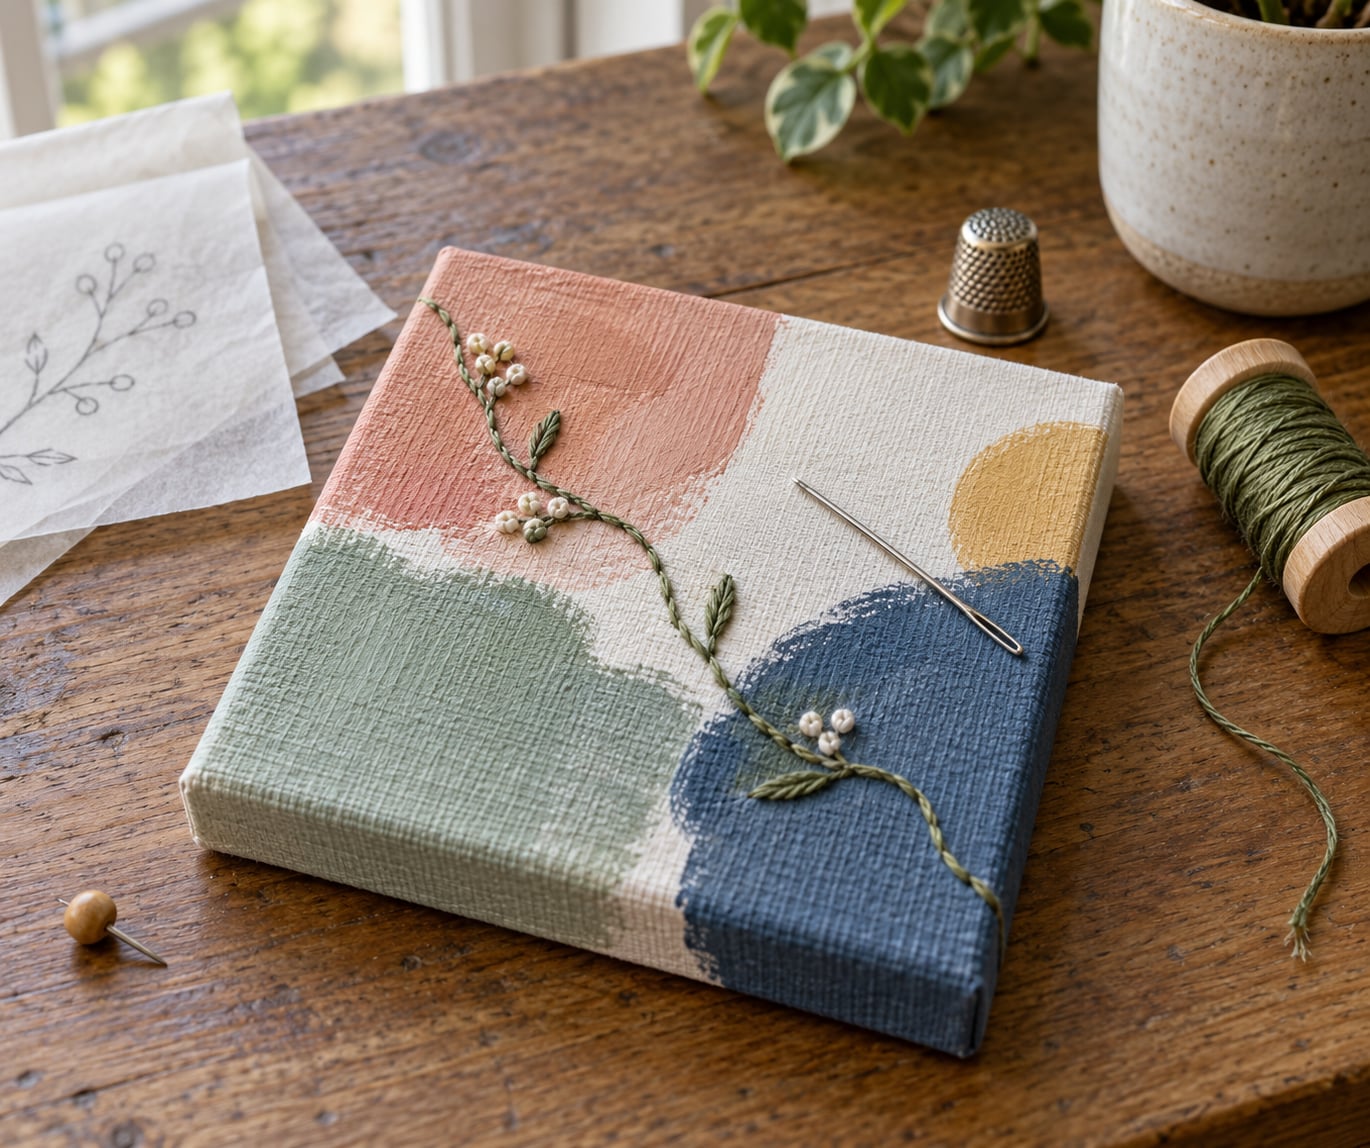
Hand embroidering on top of a painting means stitching decorative thread straight through a painted canvas or painted fabric, so the thread adds line, texture, and relief on top of the color that is already there. Yes, it works. Let the acrylic dry completely, mark your design, punch guide holes, then push a blunt needle through the weave with a thimble.
This is a mixed media technique, where two materials that are usually kept apart share one surface. Paint does color and broad shape. Thread does line, dimension, and something you can feel with your fingers. Neither one covers what the other is good at, which is why the combination reads as finished art rather than craft.
The one rule everybody learns the hard way: never stitch into paint that is not dry all the way through. A surface that feels dry to the touch can still be soft underneath, and the needle will pick up pigment, drag it, and leave a smear. Give acrylic overnight if you can, longer if the brushwork is thick.
A small 8 inch square panel is enough to learn the whole process, and a sampler of six or eight different stitches on one painted square teaches you more than a tutorial can.
Table of Contents
- What You Need
- Step-by-Step: How to Hand Embroider on Top of a Painting
- 1. Prepare the painting surface
- 2. Choose embroidery colors, threads, and stitches
- 3. Transfer or draw the embroidery design
- 4. Mount the work without hiding the painting
- 5. Secure the thread and begin stitching
- 6. Build texture and finish the embroidery
- Common Mistakes and How to Fix Them
- Frequently Asked Questions
- Can I embroider directly onto an acrylic painting?
- How do I keep embroidery from puckering the painting?
- Should I seal a painting before adding embroidery?
- What type of needle is best for stitching on painted canvas?
- How do I choose embroidery thread colors that match a painting?
- Can I embroider over thick or textured brushstrokes?
- Start With a Small Test Stitch
What You Need
The tools are ordinary. The only real decisions are your surface, your paint, and how thick the paint is where you plan to stitch.
A stable surface. Stretched primed artist canvas is the easiest place to start, because the wooden stretcher bars underneath already hold the tension. Cotton duck canvas is stiffer and takes paint well. Unstretched muslin, cotton twill, denim, and burlap all work too, and you can paint and stitch them yourself, then stretch or mount them later. Skip plastic or counted needlepoint canvas, which is a different craft with a stiff open grid and a completely different feel.
Paint that will accept thread. Acrylic is the right answer. Artist acrylics from tubes dry matte and sit into the weave; regular craft acrylics from a bottle dry shinier, which some people love and some people find plastic-looking. Watercolor will not adhere to a gessoed surface, because gesso is built to reject it. Oil stays workable for weeks, and oil solvents weaken the canvas fibers, so treat oil as a no for this project.
Needles in two shapes. A tapestry needle is blunt, and the blunt tip slips between weave threads instead of splitting them, so it leaves the canvas structure intact. A chenille needle is sharp with a large eye, and you want it for thick impasto areas where a blunt tip simply will not go through. A #3 crewel needle is fine for small floral details. If you have only one needle to start, buy a tapestry needle.
Thread with some weight. Six strand embroidery floss is the workhorse; you separate it down to one, two, or three strands to change the line weight, and a single strand gives you a fine outline while three give you a chunky seam. Pearl cotton is round and lustrous and stitches through paint more easily. Metallic thread is for accents only, because it frays and breaks at the eye of the needle far more often than cotton does.
A thimble. Push a needle through canvas plus a paint layer and you will feel it in your fingertip within a minute. A thimble is not optional equipment here, it is the difference between a pleasant afternoon and a sore hand. A finger protector with a raised dimple works if you dislike the metal feel.
A mounting frame. A small embroidery hoop, a scroll frame, or a stretcher frame that clamps only the outer margin all work. The job is to hold the fabric steady while leaving the painted face visible and untensioned.
Transfer and punching tools. Tracing paper or a carbon paper transfer sheet, a permanent marker or paint pen, a water-soluble pen that rinses away, a pushpin for pre-punching, and a thimble. A small ruler helps you keep the punched holes an even distance apart.
Before you cut into anything, run one test stitch on an offcut of the same canvas with the same paint. Push the needle through, check whether the paint cracks or the weave splits, and let it sit for an hour. Ten minutes of testing saves an afternoon of ruined work.
Step-by-Step: How to Hand Embroider on Top of a Painting
1. Prepare the painting surface
Start by confirming the paint is fully dry, not just dry on top. Press a fingernail gently into a thick stroke; if it dents or leaves a print, the layer underneath is still soft and you need more time.
Next, map where you can and cannot stitch. You cannot stitch within about half an inch of the edge of a stretched canvas, because the wooden stretcher bars sit right there and the needle has nowhere to land. Plan your composition with that margin in mind from the start. You also cannot stitch over an area that will flake, and thick raised brushwork that cracks under a finger will crack under a needle too, so keep your stitches on flatter passages or go around the ridges.
Sealing is optional and depends on your combination. A thin matte acrylic varnish can add a bit of resistance, but some varnishes stay tacky, discolor, or make the needle drag, and a glossy seal is hard to stitch through. Test any sealer on the offcut and wait a full day before judging it. On watercolor, seal only with a wax-based medium, never a water-based one, or the paper will cockle.
Success at this stage looks simple: a surface that takes a fingertip without smudging, a marked margin clear of the stretcher bars, and a test stitch that left the paint intact.
2. Choose embroidery colors, threads, and stitches
Match your floss to the painted palette first, then decide where you deliberately want contrast. A thread that sits only slightly off the painted color reads as texture, and a thread that contrasts reads as line. Deciding which one you want before you stitch saves a lot of unpicking.
Choose each stitch by the job it does on the surface. Backstitch gives a solid, unbroken line, so it suits stems, lettering, and hard edges. Split stitch looks like backstitch but lighter, and it works well for organic lines like leaf veins. Running stitch is a dashed line and reads as sketchy and quick. Satin stitch fills a shape with parallel stitches, so it works for petals and leaves, and on a painted ground you get the added bonus of the paint color showing between the stitches. French knots give a raised dot, useful for pollen, seeds, and highlights. Couching lays a thicker thread on the surface and holds it down with small stitches, which is the most forgiving way to add a rope-like line over paint.
French knots and cast-on knots are trickier on a hard surface because the needle enters at an angle, so save them for areas with more give.
3. Transfer or draw the embroidery design
Draw the design directly on the painting with a paint pen or permanent marker if you want it to become part of the piece, or trace it lightly with a water-soluble pen if you want the guide to disappear. Tracing paper or carbon paper over the painting works well for a precise pattern, and hand drawing freehand suits a looser style.
Keep the guide removable or quiet. A dark permanent line you then stitch directly along is a design choice, not a guide, and it has to look good on its own. Most people prefer a guide faint enough to disappear under thread.
This is also the step where you decide the stitch direction for every area, because a satin stitch filled in one direction catches light very differently from the same fill the other way. Once you have pierced the canvas, changing your mind means a new hole and possibly a scar in the paint.
4. Mount the work without hiding the painting
Clamp the work into a small hoop, a scroll frame, or an embroidery frame, tightening only enough to hold the fabric flat. A hoop that covers the painted face defeats the purpose, so mount from the outer margin inward and keep your image area free.
Distribute the tension evenly. Pull opposite sides alternately in small increments rather than cranking one side, and press the fabric flat with your palm before you start. Over-tightening pulls the brushwork out of shape and produces the puckering that is the most common complaint in this technique.
Success means the fabric lies flat under the frame, the painted image is fully visible, and the painted face is not bowed or rippled. If you see gathering along an edge, loosen and redistribute.
5. Secure the thread and begin stitching
Cut your thread roughly 18 to 24 inches, which is the longest length that stays manageable without tangling, and thread it through the eye. Start with a small backstitch at a point you are happy to be permanent, or a tiny knot placed in the margin where it will be covered later.
Insert the needle from the back to the front at a slight angle, using the thimble on the pushing hand. Pulling straight up on a blunt needle through paint is the move that snaps thread. Bring the thread through from the underside so the loop never drags across the painted surface, and keep the thread taut but not tight, roughly the same tension as a guitar string, no more.
If the thread snags as you pull, stop and back the needle out slightly rather than yanking. A snag usually means a paint edge or a rough thread end, and pulling harder turns a small snag into a broken thread. Success looks like even, unstrained stitches with no drag marks and no fuzz collecting on the surface.
6. Build texture and finish the embroidery
Work from the background forward. Fill the large, quiet areas of the embroidery first and leave the focal details, the flower centers and the sharpest stems, until last, so your hand and the thread do not have to work around finished stitching.
Vary the stitch density as you go. Denser satin stitch gives a solid, raised form, while a sparser fill lets the painted color show through and stays in conversation with the paint underneath. That contrast between opaque thread and translucent paint is the whole point of the technique.
To finish, weave each thread end in on the back by running it under several existing stitches, trim it close, and repeat. If you display the piece as-is rather than in a frame, cover the back with a square of fabric or an acid-free backing so knots and thread runs are not the first thing a viewer sees.
Pull the work out of the frame and look at it in flat light. Check for loose threads, any place the canvas has puckered, and any area where the embroidery has grown so dense that the painting has disappeared under it. That last problem is easy to fix while you still have the piece in hand.
Common Mistakes and How to Fix Them
Stitching over paint that is not dry. The needle picks up pigment and drags a visible smear through your image. Wait until a fingernail print does not dent the stroke, and give thick areas longer than you think they need.
Puckering. Usually caused by tightening the frame too much or by pulling thread too hard. Loosen the frame, let the fabric relax, and re-tension in small even increments. Puckers that are already set usually relax if you leave the work flat under something light for a few hours.
Uneven tension. Consistent, slightly loose tension beats tight, and tight thread is what causes both puckering and thread breakage. Hold the thread with a light touch and let the stitch length do the work.
Muddy colors. This one is about the thread, not the paint. When floss and paint sit too close in value, both disappear. Pick a thread either clearly lighter or clearly darker than the color underneath.
Broken thread. The usual cause is a rough eye of the needle, a dry or brittle metallic thread, or a snagged paint edge. Enlarge the needle eye with a fine file, switch to cotton or a fresher spool, and back the needle out when you feel a snag rather than pulling.
Embroidery that competes with the painting. If the thread covers most of the image, the paint has become a backing rather than artwork. Thin the floss to one or two strands, use open stitches, and leave painted areas deliberately bare.
Paint flaking or cracking at the stitches. Avoid heavy impasto, seal only after testing, and treat a crack as a signal to change route rather than to push harder. Prevention is the only real fix.
The prevention list is short: test on an offcut, stitch the sampler before the real piece, keep your margin in mind, and make every hole count. Needle holes stay in the canvas permanently, so the spot where a hole appears is the spot where the stitch has to be. Decide before you punch.
Frequently Asked Questions
Can I embroider directly onto an acrylic painting?
Yes. Acrylic on primed canvas is the most reliable combination for hand embroidery on a painting, because the paint dries hard, grips the weave, and the thread sits on top rather than sinking. Let the acrylic dry completely, which is usually overnight for thin layers and two days for thick brushwork. Then use a blunt tapestry needle and push it through with a thimble.
How do I keep embroidery from puckering the painting?
Puckering comes from two places: over-tightening the frame before you start, and pulling the thread too hard as you stitch. Mount the fabric with only enough tension to hold it flat, and tighten opposite sides in small increments instead of pulling one side hard. Keep your thread tension light and consistent, and lay the work flat under something light if a crease forms.
Should I seal a painting before adding embroidery?
Sometimes, and it depends entirely on the paint and the sealer. A thin matte varnish can add a little bite so the needle does not drag, but some varnishes stay tacky or discolor, and a glossy seal is difficult to stitch through. Test any sealer on an offcut of the same canvas and wait a full day before judging it. Skip sealing entirely if your paint is matte and holds the thread well.
What type of needle is best for stitching on painted canvas?
A tapestry needle is the best all-round choice because its blunt tip slips between the weave threads instead of splitting them, which keeps the canvas from fraying. Switch to a sharp chenille needle for thick impasto areas where a blunt tip will not go through at all. A number 3 crewel needle handles fine floral detail on flatter paint.
How do I choose embroidery thread colors that match a painting?
Pull the palette from the painting first, then choose on purpose. A floss color close in value to the paint underneath reads as texture and lets the image show through, which is what you want over a detailed area. A color clearly lighter or darker reads as line and outline, which is what you want along edges and stems. Pick a middle ground and both the paint and the thread disappear.
Can I embroider over thick or textured brushstrokes?
You can, but it is the hardest part of the surface. Thick paint makes the needle entry stiff and uneven, and brittle ridges can chip or crack when pierced. Use a sharp chenille needle and a thimble, punch guide holes with a pushpin first, and route your stitches around the highest ridges where you can. If a stroke flakes at the point of the needle, treat it as a closed area and work beside it instead.
Start With a Small Test Stitch
Begin with one small painted sample and treat it as a sampler. Run a single row of backstitch across a flat painted area, then a small satin fill over a different color, so you learn how to hand embroider on top of a painting before you commit to a large piece.
That test tells you three things quickly: whether the paint cracks, how hard the needle is to push through, and how the floss color sits against the paint underneath. Once you know those, the technique is just repetition, and a stitched painting is far less fragile than it looks on the day you start.